Translations:Munter hitch/21/en: Difference between revisions
Importing a new version from external source |
Importing a new version from external source |
||
| Line 1: | Line 1: | ||
{{#invoke:FlexGallery|gallery_with_widths | |||
|File: hms_tieoff_step1_p6w.png | |||
|120px | |||
|If the knot is not in the correct position, flip the knot by giving a bit of a slack (1) | |||
|File: hms_tieoff_step2_p8w.png | |||
|160px | |||
|Make a loop (2) | |||
|File: hms_tieoff_step3_p8w.png | |||
|160px | |||
|Move it behind the sharp end of the rope (3) | |||
|File: hms_tieoff_step4_p8w.png | |||
|160px | |||
|Pull a bight of the rope belay end through the loop (4), making a slipknot around the sharp end | |||
|File: Munter_tieoff_step5.png | |||
|200px | |||
|Grab the bight with a hand (5) and simultaneously take slack out of the system while releasing the other hand (6), note that the break strand is still always being held during this step | |||
|File: hms_tieoff_step7_p8w.png | |||
|160px | |||
|Pull the bight through the carabiner (7), increase its size if necessary for the next steps | |||
|File: hms_tieoff_step8_p8w.png | |||
|160px | |||
|Secure the tie-off... | |||
|File: hms_tieoff_step9_p6w.png | |||
|120px | |||
|... by making an overhand around the life end of the rope (8,9) | |||
|File: hms_tieoff_step10_p6w.png | |||
|120px | |||
|And the mule-overhand tie-off is done | |||
}} | |||
Latest revision as of 07:59, 25 September 2025
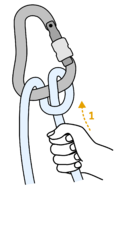
If the knot is not in the correct position, flip the knot by giving a bit of a slack (1) 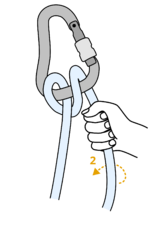
Make a loop (2) 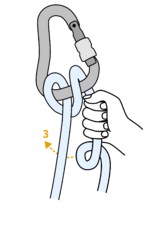
Move it behind the sharp end of the rope (3) 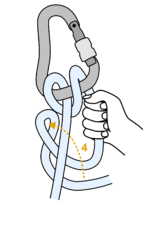
Pull a bight of the rope belay end through the loop (4), making a slipknot around the sharp end 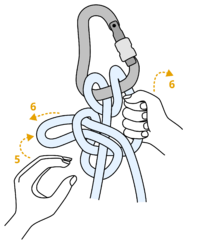
Grab the bight with a hand (5) and simultaneously take slack out of the system while releasing the other hand (6), note that the break strand is still always being held during this step 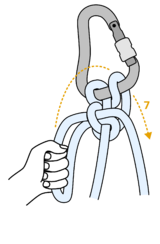
Pull the bight through the carabiner (7), increase its size if necessary for the next steps 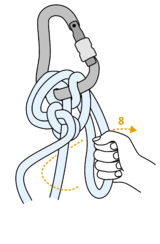
Secure the tie-off... 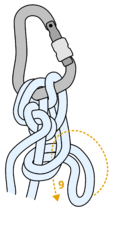
... by making an overhand around the life end of the rope (8,9) 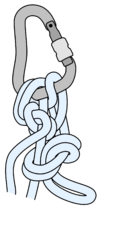
And the mule-overhand tie-off is done


