Figure eight: Difference between revisions
Created the Figure 8 page - basic template |
m added alt texts for SEO |
||
| (23 intermediate revisions by the same user not shown) | |||
| Line 2: | Line 2: | ||
<languages/> | <languages/> | ||
{{Infobox knot | {{Infobox knot | ||
| image = File: Fig8.jpg | |||
| image_alt = Figure-eight loop | |||
| other_names = Figure 8, eight | | other_names = Figure 8, eight | ||
| pros = Reliable, easy to inspect, low decrease of the rope strength | | pros = Reliable, easy to inspect, low decrease of the rope strength | ||
| Line 10: | Line 12: | ||
}} | }} | ||
Figure-eight | {{messagebox_checkstate}} | ||
The '''Figure-eight loop''' is the most common way how to tie onto the rope. Together with a re-threaded bowline, it is one of the two widely accepted knots for tying-in at the rope end. It is popular for its reliability and visual clarity, which makes it easy to inspect. It can be difficult to untie after bigger lead falls, especially if it was not properly [[#Preventing from getting stuck|pre-tightened]]. Closely related figure-8 bend knot is [[#Rolling|prone to roll]]. | |||
== Tying == | == Tying == | ||
=== Follow-through (end) === | === Follow-through (tie-in on the rope end) === | ||
This method is the most commonly used method for tying-in onto a rope end. | |||
{{#invoke:FlexGallery|gallery_with_widths_alt | |||
|File: fig8_step1.png | |||
|90px | |||
|Take a bight of a rope and turn its one end around the other, making a full 360° turn (1) | |||
|rope bight with one end twisted around the other | |||
|File: fig8_step2.png | |||
|90px | |||
|Pull the rope through the upper eye (2), creating a figure-eight knot | |||
|twisted rope bight with an arrow pointing through the top loop | |||
|File: fig8_step3.png | |||
|180px | |||
|Pull the rope through both eyes of a harness next to the belay loop (3) | |||
|figure-eight knot with an arrow from the rope end through the harness eyes | |||
|File: fig8_step4.png | |||
|180px | |||
|Continue by following-through... (4) | |||
|rope with figure-eight knot, one rope end is pulled through harness and being directed to follow the knot through | |||
|File: fig8_step5.png | |||
|180px | |||
|... the original figure-eight (5)... | |||
|rope with figure-eight knot, one rope end is pulled through harness and being directed to follow the knot through | |||
|File: fig8_step6.png | |||
|180px | |||
|... knot (6) | |||
|rope with figure-eight knot, one rope end is pulled through harness and being directed to follow the knot through | |||
|File: fig8_step7to10.png|180px | |||
|Tighten the rope ends one at a time (7,8,9,10) | |||
|loose figure eight tied on a harness, arrows pointing out from the knot | |||
|File: fig8_step11.png | |||
|180px | |||
|Inspect the knot and check if the loop is threaded through the harness correctly (11) | |||
|tightened figure eight on a harness, eye icon | |||
}} | |||
The inspection described in the last step should be also done as a part of a partner check. | |||
=== On a bight (tie in in a middle) === | |||
{{#invoke:FlexGallery|gallery_with_alt|100px | |||
|File: fig8_mid_step1.png | |||
|Take a bight of a rope and do a bend (1) | |||
|rope bight with an arrow | |||
|File: fig8_mid_step2.png | |||
|Make a full 360° turn of the bend around the rope strands (2) | |||
|bent rope bight with an arrow around the bight | |||
|File: fig8_mid_step3.png | |||
|Pull the bight through the loop made by the turn (3) | |||
|bent rope bight tangled around the rope strands with arrow pointing through a loop | |||
|File: fig8_mid_step4.png | |||
|Slightly tighten the knot (4) | |||
|Very loose figure eight | |||
|File: fig8_mid_step5.png | |||
|If the knot is malformed, dress it for easier inspection (5) | |||
|figure eight | |||
|File: fig8_mid_step6.png | |||
|Inspect the knot (6) | |||
|dressed figure eight with an eye icon | |||
}} | |||
== Preventing from getting stuck == | == Preventing from getting stuck == | ||
In some cases, Figure 8 tends to get hard to untie. To prevent this issues, always dress the knot and tie its form where the load strand goes in a bigger diameter around the center of the knot, as illustrated below. This variant also has a slightly higher loading limit according to some sources (10% difference, both variants are completely safe).<ref>{{cite web | url=https://www.lezec.cz/clanek.php?key=841 | archive-url=https://web.archive.org/web/20240226094325/https://www.lezec.cz/clanek.php?key=841 | archive-date=26 February 2024 | url-status=live | title=Metodické ústřižky III. | publisher=EnergyCloud Trade, s.r.o. | first1=''John'' Jiří | last1=Žižka | first2=''Bolek'' Karel | last2=Kříž | date=16 September 2002 | website=lezec.cz | access-date=16 August 2025}}</ref> The issue of figure 8 getting stuck was well studied and documented/illustrated by Hard is Easy.<ref>{{Cite AV media | people= Hard is easy | date=29 August 2020 | title=Why Figure 8 knot is NOT hard to untie! | url=https://www.youtube.com/watch?v=QAr-uHd8h8o | publisher=Hard is Easy | access-date=16 August 2025}}</ref> If the figure 8 is not dressed and tightened properly before loading it, it tends to malform substantially after taking a fall. Malformation leads to a knot state in which the figure 8 is hard and sometimes even almost impossible to untie. Rope parameters (diameter, stiffness) also play a role. Last very important parameter discovered was if the load strand goes on the top of the knot, or in the middle of it. | |||
{{#invoke:FlexGallery|gallery_with_alt|200px | |||
|File: fig8_tighten.png | |||
|By properly pre-tightening the knot before loading, you minimize the chance of getting it stuck | |||
|hand on a figure eight knot, arrows pointing in direction the rope leaves the knot | |||
|File: fig8_goodstrand.png | |||
|Allegedly slightly stronger variant. It is easier to untie after a fall | |||
|figure eight with one strand highlighted | |||
|File: fig8_uglystrand.png | |||
|This variant is more prone to get stuck after big lead falls | |||
|figure eight with other strand highlighted, warning symbol | |||
}} | |||
== Rolling == | == Rolling == | ||
[[File:fig8_roller.png|200px|thumb|left|When the ropes coming from the figure 8 are pulled in the opposite directions, the knot might capsize and roll over itself|alt=figure eight bent with a warning symbol and arrows illustrating capsizing direction]] | |||
The Figure 8 bend knot can capsize and roll over itself already around 3 kN of force (then it snaps). For that reason it is not an ideal knot for tying two ropes together.<ref name=Edelrid2023>{{cite web | url=https://edelrid.com/eu-en/knowledge/knowledge-base/knots-for-connecting-ropes-when-rappelling-comparison | title=Knots for connecting ropes when rappelling - a comparison | publisher=EDELRID GmbH & Co. KG | first1=Florian |last1=Hellberg | date=14 August 2023 | website=edelrid | access-date=16 August 2025}}</ref> There are speculations that the usage of Figure 8 bend knot during rapelling is the reason why the overhand-bend knot is known as an European Death knot in US.<ref>{{cite web | url=https://user.xmission.com/~tmoyer/testing/EDK.html | archive-url=https://web.archive.org/web/20250729104327/https://user.xmission.com/~tmoyer/testing/EDK.html | archive-date=29 July 2025 | url-status=live | title=Pull Tests of the "Euro Death-Knot" | first1=Thomas | last1=Moyer | date=11 September 1999 | website=xmission.com | access-date=16 August 2025}}</ref> | |||
== References == | == References == | ||
Latest revision as of 16:31, 5 November 2025
| Figure eight | |
|---|---|
 | |
| Other names | Figure 8, eight |
| Use(s) | Tying onto the rope end/middle, end-knot (single strand, marking) |
| Pros | Reliable, easy to inspect, low decrease of the rope strength |
| Cons | Tedious to untie after a lead fall in some cases, figure-eight bend is prone to rolling |
| Category | Knot |
| Strength | ~60-80% in normal (non-ring) load. Differs by author, type of measurement and rope[1] |
Review state This page has not been reviewed yet (review state explanation). |
The Figure-eight loop is the most common way how to tie onto the rope. Together with a re-threaded bowline, it is one of the two widely accepted knots for tying-in at the rope end. It is popular for its reliability and visual clarity, which makes it easy to inspect. It can be difficult to untie after bigger lead falls, especially if it was not properly pre-tightened. Closely related figure-8 bend knot is prone to roll.
Tying
Follow-through (tie-in on the rope end)
This method is the most commonly used method for tying-in onto a rope end.
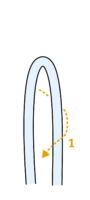
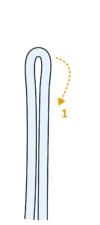
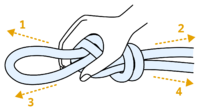
Take a bight of a rope and turn its one end around the other, making a full 360° turn (1) 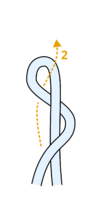
Pull the rope through the upper eye (2), creating a figure-eight knot 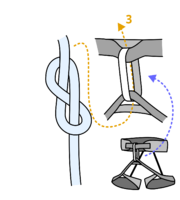
Pull the rope through both eyes of a harness next to the belay loop (3) 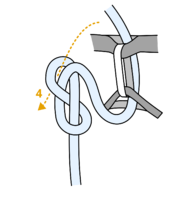
Continue by following-through... (4) 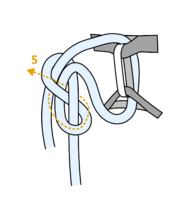
... the original figure-eight (5)... 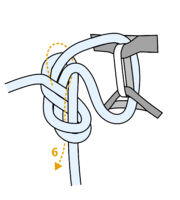
... knot (6) 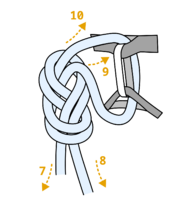
Tighten the rope ends one at a time (7,8,9,10) 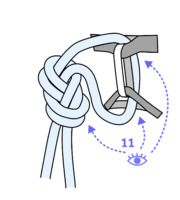
Inspect the knot and check if the loop is threaded through the harness correctly (11)


The inspection described in the last step should be also done as a part of a partner check.
On a bight (tie in in a middle)
Take a bight of a rope and do a bend (1) 
Make a full 360° turn of the bend around the rope strands (2) 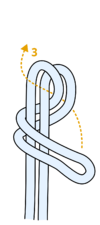
Pull the bight through the loop made by the turn (3) 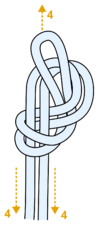
Slightly tighten the knot (4) 
If the knot is malformed, dress it for easier inspection (5) 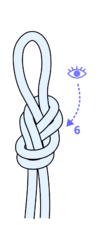
Inspect the knot (6)


Preventing from getting stuck
In some cases, Figure 8 tends to get hard to untie. To prevent this issues, always dress the knot and tie its form where the load strand goes in a bigger diameter around the center of the knot, as illustrated below. This variant also has a slightly higher loading limit according to some sources (10% difference, both variants are completely safe).[2] The issue of figure 8 getting stuck was well studied and documented/illustrated by Hard is Easy.[3] If the figure 8 is not dressed and tightened properly before loading it, it tends to malform substantially after taking a fall. Malformation leads to a knot state in which the figure 8 is hard and sometimes even almost impossible to untie. Rope parameters (diameter, stiffness) also play a role. Last very important parameter discovered was if the load strand goes on the top of the knot, or in the middle of it.
By properly pre-tightening the knot before loading, you minimize the chance of getting it stuck 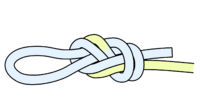
Allegedly slightly stronger variant. It is easier to untie after a fall 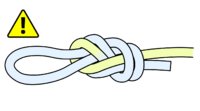
This variant is more prone to get stuck after big lead falls


Rolling

The Figure 8 bend knot can capsize and roll over itself already around 3 kN of force (then it snaps). For that reason it is not an ideal knot for tying two ropes together.[4] There are speculations that the usage of Figure 8 bend knot during rapelling is the reason why the overhand-bend knot is known as an European Death knot in US.[5]
References
- ↑ EDELRID Team (20 October 2020). "Strength reduction of textile materials by knots". edelrid. EDELRID GmbH & Co. KG. Retrieved 10 August 2025.
- ↑ Žižka, John Jiří; Kříž, Bolek Karel (16 September 2002). "Metodické ústřižky III". lezec.cz. EnergyCloud Trade, s.r.o. Archived from the original on 26 February 2024. Retrieved 16 August 2025.
- ↑ Hard is easy (29 August 2020). Why Figure 8 knot is NOT hard to untie!. Hard is Easy. Retrieved 16 August 2025.
- ↑ Hellberg, Florian (14 August 2023). "Knots for connecting ropes when rappelling - a comparison". edelrid. EDELRID GmbH & Co. KG. Retrieved 16 August 2025.
- ↑ Moyer, Thomas (11 September 1999). "Pull Tests of the "Euro Death-Knot"". xmission.com. Archived from the original on 29 July 2025. Retrieved 16 August 2025.