Munter hitch: Difference between revisions
m Infobox - polishing flow with support of chatGPT |
Added reference to the munter finger and did small readability refinements |
||
| Line 4: | Line 4: | ||
{{Infobox knot | {{Infobox knot | ||
| image = File: Munter_on_white.jpg | | image = File: Munter_on_white.jpg | ||
| other_names = HMS, HMS knot, | | other_names = HMS, HMS knot, Munter | ||
| pros = Fast and simple, requires only an HMS carabiner, works at any angle, allows smooth lowering of a second climber | | pros = Fast and simple, requires only an HMS carabiner, works at any angle, allows smooth lowering of a second climber | ||
| cons = Causes rope abrasion, prone to rope tangling, no braking assistance | | cons = Causes rope abrasion, prone to rope tangling, no braking assistance | ||
| Line 12: | Line 12: | ||
<!--T:2--> | <!--T:2--> | ||
Munter hitch (also known as HMS) is | Munter hitch (also known as HMS) is a knot used for belaying when a belay device is unavailable or impractical. For its simplicity, it is often employed in the advanced rope techniques, including rescue techniques. | ||
== Tying == <!--T:10--> | == Tying == <!--T:10--> | ||
| Line 18: | Line 18: | ||
<!--T:11--> | <!--T:11--> | ||
=== Tying for an anchor belay (easy method) === | === Tying for an anchor belay (easy method) === | ||
This method is very robust and | This method is very robust and ideal for learning the Munter hitch. | ||
<!--T:12--> | <!--T:12--> | ||
| Line 26: | Line 26: | ||
|Make a loop (1) | |Make a loop (1) | ||
|File: Hms_ez_step2.png | |File: Hms_ez_step2.png | ||
|Pull | |Pull your thumb through the loop (2) | ||
|File: Hms_ez_step3.png | |File: Hms_ez_step3.png | ||
|Place another strand over your thumb and close the hand with your index finger (3) | |Place another strand over your thumb and close the hand with your index finger (3) | ||
| Line 34: | Line 34: | ||
|Screw the safety-lock (5) | |Screw the safety-lock (5) | ||
|File: Hms_ez_step6.png | |File: Hms_ez_step6.png | ||
|Inspect that everything is correct (6) and as a final | |Inspect that everything is correct (6) and as a final test, pull the brake strand (7), the Munter hitch flips into another Munter | ||
}} | }} | ||
| Line 46: | Line 46: | ||
|Take a bight of the rope (1) | |Take a bight of the rope (1) | ||
|File: Hms_harness_step2.png | |File: Hms_harness_step2.png | ||
| | |Make a loop (2) | ||
|File: Hms_harness_step3.png | |File: Hms_harness_step3.png | ||
|Open the carabiner gate (3) and seat the loop into the carabiner (4) | |Open the carabiner gate (3) and seat the loop into the carabiner (4) | ||
| Line 52: | Line 52: | ||
|Screw the safety-lock (5) | |Screw the safety-lock (5) | ||
|File: Hms_harness_step5.png | |File: Hms_harness_step5.png | ||
|Inspect that everything is correct (6) and pull the break-strand (7) to test if the munter hitch flips into another munter | |Inspect that everything is correct (6) and pull the break-strand (7) to test if the munter hitch flips into another munter | ||
}} | }} | ||
<!--T:16--> | <!--T:16--> | ||
== Belaying == | == Belaying == | ||
Always hold the break strand! Belaying with Munter hitch is reliable and reasonably comfortable. | Always hold the break strand! Belaying with Munter hitch is reliable and reasonably comfortable. In works smoothly when not loaded, but provides plenty of friction to catch a fall once tensioned. It works at any angle of the brake strand. The main drawback is that if the rope is pulled through the hitch under load, it tends to tangle the rope, which is the main reason why it is now used only rarely. | ||
<!--T:18--> | <!--T:18--> | ||
=== Belaying risks === | === Belaying risks === | ||
Belayer should keep their fingers at a respectful distance from the knot. Otherwise they might risk jamming the fingers into the belay, which might result in a severe finger injury.<ref>{{cite web | url=https://rescue2training.com/tying-a-munter-hitch-around-an-object/ | title=Tying a Munter Hitch Around an Object (updated) | publisher=Rescue 2 Training | website=Rescue2Training.com | access-date=25 September 2025 | url-status=live | archive-url=https://web.archive.org/web/20250925045809/https://rescue2training.com/tying-a-munter-hitch-around-an-object/ | archive-date=25 September 2025}}</ref> Belayer should also ensure to tie the Munter in a way that it wont interfere with the carabiner gate/lock. Otherwise the rope friction might unlock, and maybe even open the carabiner gate. | |||
<!--T:19--> | <!--T:19--> | ||
| Line 67: | Line 67: | ||
|File: Munter_fingers_safe.png | |File: Munter_fingers_safe.png | ||
|135px | |135px | ||
|When catching a fall, the rope slips a bit through the | |When catching a fall, the rope slips a bit through the Munter. Keep your hand in a respectful distance from the hitch... | ||
|File: Munter_fingers.png | |File: Munter_fingers.png | ||
|135px | |135px | ||
| Line 76: | Line 76: | ||
|File: Hms belay with climber.png | |File: Hms belay with climber.png | ||
|120px | |120px | ||
|... tie the | |... tie the Munter in a way that it does not interfere with the carabiner gate/lock | ||
|File: hms_belay_left_top.png | |File: hms_belay_left_top.png | ||
|120px | |120px | ||
| Line 166: | Line 166: | ||
}} | }} | ||
== References == | |||
{{reflist}} | |||
</translate> | </translate> | ||
Revision as of 05:01, 25 September 2025
| Munter hitch | |
|---|---|
 | |
| Other names | HMS, HMS knot, Munter |
| Use(s) | Belaying, rescue techniques |
| Pros | Fast and simple, requires only an HMS carabiner, works at any angle, allows smooth lowering of a second climber |
| Cons | Causes rope abrasion, prone to rope tangling, no braking assistance |
| Category | Hitch |
Munter hitch (also known as HMS) is a knot used for belaying when a belay device is unavailable or impractical. For its simplicity, it is often employed in the advanced rope techniques, including rescue techniques.
Tying
Tying for an anchor belay (easy method)
This method is very robust and ideal for learning the Munter hitch.

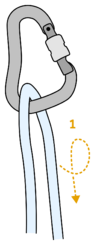
Make a loop (1) 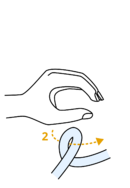
Pull your thumb through the loop (2) 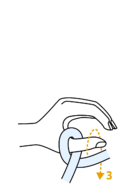
Place another strand over your thumb and close the hand with your index finger (3) 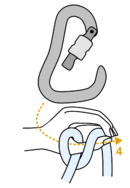
Pull the carabiner through the rope exactly in the path of your thumb (4) 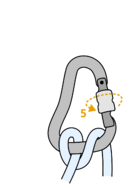
Screw the safety-lock (5) 
Inspect that everything is correct (6) and as a final test, pull the brake strand (7), the Munter hitch flips into another Munter


Tying for a harness belay
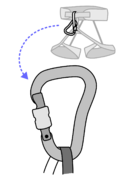
Start with a rope through the carabiner which is attached to your harness 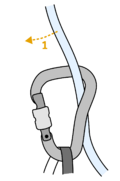
Take a bight of the rope (1) 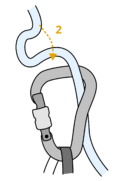
Make a loop (2) 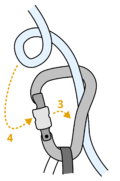
Open the carabiner gate (3) and seat the loop into the carabiner (4) 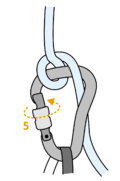
Screw the safety-lock (5) 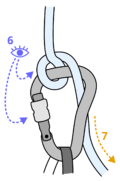
Inspect that everything is correct (6) and pull the break-strand (7) to test if the munter hitch flips into another munter


Belaying
Always hold the break strand! Belaying with Munter hitch is reliable and reasonably comfortable. In works smoothly when not loaded, but provides plenty of friction to catch a fall once tensioned. It works at any angle of the brake strand. The main drawback is that if the rope is pulled through the hitch under load, it tends to tangle the rope, which is the main reason why it is now used only rarely.
Belaying risks
Belayer should keep their fingers at a respectful distance from the knot. Otherwise they might risk jamming the fingers into the belay, which might result in a severe finger injury.[1] Belayer should also ensure to tie the Munter in a way that it wont interfere with the carabiner gate/lock. Otherwise the rope friction might unlock, and maybe even open the carabiner gate.
When catching a fall, the rope slips a bit through the Munter. Keep your hand in a respectful distance from the hitch... 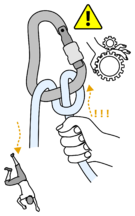
... otherwise you risk jamming a finger If you plan to belay from the harness... 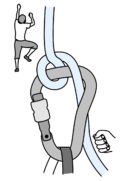
... tie the Munter in a way that it does not interfere with the carabiner gate/lock 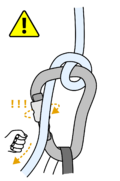
Otherwise the rope friction might unlock... 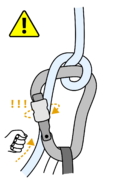
... or even open the carabiner during belaying


Tie-off - Mule overhand
This is the most recognized method to tie-off the mule overhand to set your hands free. The tie-off consists from a slipknot and then overhand knot, both of which are tied around the life end of the rope. As both of these knots are tied with a bight and rope is also pulled through the carabiner, it takes practice to be able to inspect an tie the tie-off reliably.
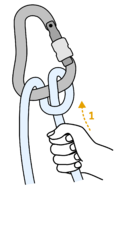
If the knot is not in the correct position, flip the knot by giving a bit of a slack (1) 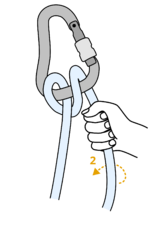
Create a loop (2) 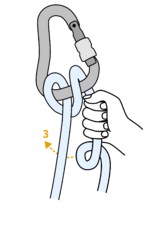
Move it behind the sharp end of the rope (3) 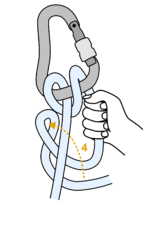
Pull a bight of the rope belay end through the loop (4), making a slipknot around the sharp end 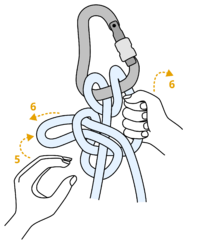
Grab the bight with a hand (5) and simultaneously take slack out of the system while releasing the other hand (6), note that the break strand is always being held during this step 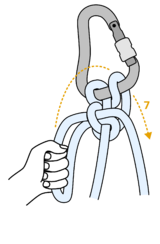
Pull the bight through the carabiner (7), increase its size if necessary for the next steps 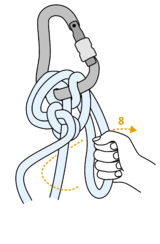
Secure the tie-off... 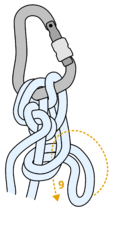
... by making an overhand around the life end of the rope (8,9) 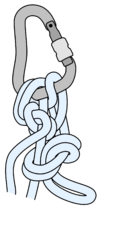
And the mule-overhand tie-off is done


Alternative tying methods
Single hand method
Fast method using single hand move.

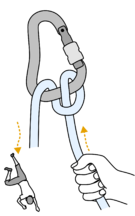
Start with a rope through a carabiner. Grab the rope strand further from you with your right hand thumb pointing down and rotate your hand counterclockwise (1) 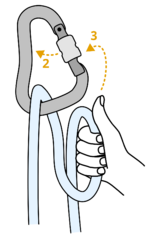
Pull the rope through the carabiner gate (2,3) 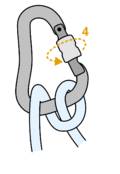
Screw the gate of the carabiner (4) 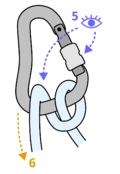
Visually inspect if everything is correct (5) and as a final check pull the break-strand (6) to see if the munter hitch flips into another munter


Detailed method
Step-by-step, very detailed description.
Make a loop on the rope strand farther from you (1) 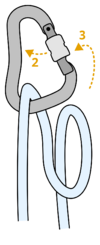
Open the carabiner gate (3) and pull the rope through the gate (2) 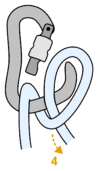
Sit the rope into the carabiner (4) 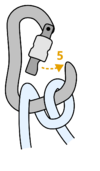
Close the carabiner gate (5) 
Screw the safety-lock (6) 
Visually inspect that everything is correct (7) and pull the break-strand (8)... 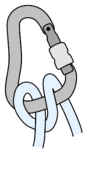
... to see if the munter hitch flips into another munter hitch as a final check


References
- ↑ "Tying a Munter Hitch Around an Object (updated)". Rescue2Training.com. Rescue 2 Training. Archived from the original on 25 September 2025. Retrieved 25 September 2025.