Rope support with tuber: Difference between revisions
→Using the rope support: - adjusted captions, separated efficiency note |
Matched the size between building and using, added dismantling section, minor refinements (added linkage) |
||
| Line 8: | Line 8: | ||
}} | }} | ||
Rope support is used in a case when the climber belayed from top needs help by lifting up while performing a hard move. It can be also employed as a support to the second climber during rescue if second climber just needs a bit of help to complete the ascend. | Rope support is used in a case when the climber belayed from top needs help by lifting up while performing a hard move. It can be also employed as a support to the second climber during rescue if second climber just needs a bit of help to complete the ascend. It is a 2:1 [[pulley]] system built from [[carabiner]] and [[prusik_knot|prusik]], using [[tuber]] in guide mode as a ratchet. | ||
== Building the rope support == | == Building the rope support == | ||
| Line 35: | Line 35: | ||
{{#invoke:FlexGallery|gallery | {{#invoke:FlexGallery|gallery | ||
| | |110px | ||
|File:rope_support_atc_pull_step1.png | |File:rope_support_atc_pull_step1.png | ||
|Pull the belay rope end up to lift your climbing partner | |Pull the belay rope end up to lift your climbing partner | ||
| Line 45: | Line 45: | ||
|Reset the pulley by sliding the prusik down on the live strand of the rope | |Reset the pulley by sliding the prusik down on the live strand of the rope | ||
}} | }} | ||
== Removing the rope support == | |||
{{#invoke:FlexGallery|gallery_with_widths | |||
|File:rope_support_atc_dismantle_step1.png|110px | |||
|Tie off the tuber to get your hand free | |||
|File:rope_support_atc_dismantle_step2.png|110px | |||
|Unscrew and remove the carabiner and prusik | |||
|File:rope_support_atc_dismantle_step3.png|110px | |||
|Remove the tie off, remember to keep at least one hand on the rope during this step | |||
|File:rope_support_atc_step1.png|135px | |||
|Now you can continue with belaying | |||
}} | |||
Alternatively, you do not need to tie off the tuber in case that while removing the Prusik with the carabiner, you always keep one hand on the break strand. | |||
== Efficiency note == | == Efficiency note == | ||
Revision as of 06:38, 4 October 2025
| Rope support with tuber | |
|---|---|
| Other names | Rope support |
| Use(s) | Multipitch, mountaineering, rescue |
| Pros | Gives leverage to help with making a hard move |
| Cons | Taking slack is much slower |
Rope support is used in a case when the climber belayed from top needs help by lifting up while performing a hard move. It can be also employed as a support to the second climber during rescue if second climber just needs a bit of help to complete the ascend. It is a 2:1 pulley system built from carabiner and prusik, using tuber in guide mode as a ratchet.
Building the rope support
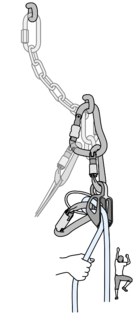
This rope support can be performed only while belaying from above 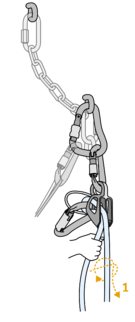
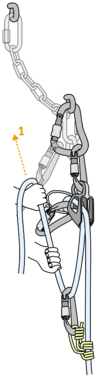
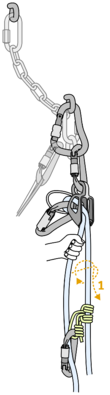
Start with a tie-off of the tuber (1) 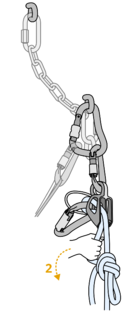
After the tie-off you can let go (2) 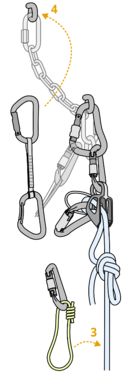
Tie a prusik onto the life strand (3) and place a quickdraw if you want to pull in downwards direction (optional, 4) 
Pull the rope through the carabiner(s) (5) 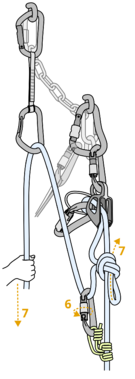
You can close the lock (6) and remove the tie-off while holding the brake strand (7) 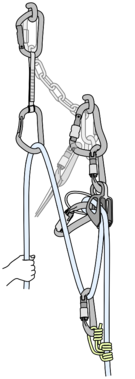
Now you are ready to provide the rope support 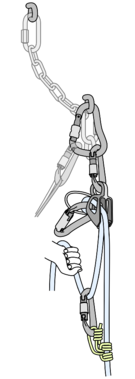
Alternatively, this is an illustration of the finished setup without the redirecting quickdraw and with unlocked carabiner for Prusik


Using the rope support
When you give a rope support, it is best practice to have a short prusik and always slide it on the live strand of the rope as far as you can easily reach with your hand. Otherwise you have to reset the prusik more often, slowing-down the process.
Pull the belay rope end up to lift your climbing partner 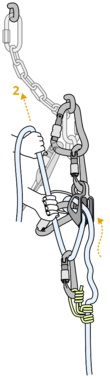
After the ATC gets unblocked, additional slack is taken out of the system 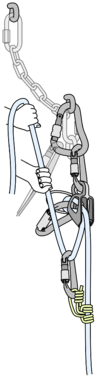
Once the pulley is in its top position, grab the belay strand between the tuber and the carabiner 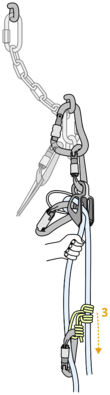
Reset the pulley by sliding the prusik down on the live strand of the rope


Removing the rope support
Tie off the tuber to get your hand free 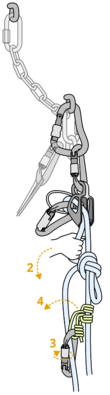
Unscrew and remove the carabiner and prusik 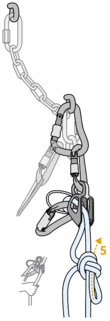
Remove the tie off, remember to keep at least one hand on the rope during this step Now you can continue with belaying


Alternatively, you do not need to tie off the tuber in case that while removing the Prusik with the carabiner, you always keep one hand on the break strand.
Efficiency note
As the ATC adds a lot of friction to this system, the pulley theoretically gives only 2:1 leverage as only the belay strand part of the rope which is behind the ATC is active during pulling. However, 3:1 length of slack relative to lift height must be taken, as the rope must still be pulled through the ATC. Real world testing done by John Gordino (Alpinesavvy) shown that in reality, due to a friction, it provides only roughly 1.5:1 leverage.[1] That means that for a 75 kg climber, 50 kg of weight has still to be pulled up with three times the length of the rope to be pulled compared to system without the pulley.
References
- ↑ Godino, John. "Progress capture - efficiencies of various devices". AlpineSavvy.com. Alpinesavvy LLC. Archived from the original on 19 November 2021. Retrieved 27 September 2025.