Munter hitch: Difference between revisions
Added single hand tying method |
Marked this version for translation |
||
| Line 1: | Line 1: | ||
<translate> | <translate> | ||
<!--T:1--> | |||
<languages/> | <languages/> | ||
{{Infobox knot | {{Infobox knot | ||
| image = File: Munter_on_white.jpg | | image = File: Munter_on_white.jpg | ||
| Line 19: | Line 19: | ||
Fast method using single hand move. | Fast method using single hand move. | ||
<!--T:6--> | |||
[[File: Hms hand step1.png|150px]] | [[File: Hms hand step1.png|150px]] | ||
[[File: Hms hand step2.png|150px]] | [[File: Hms hand step2.png|150px]] | ||
| Line 24: | Line 25: | ||
[[File: Hms hand step4.png|150px]] | [[File: Hms hand step4.png|150px]] | ||
<!--T:7--> | |||
'''Steps description''': Start with a rope through a carabiner. Grab the rope strand closer to you behind the other strand. Pull the rope strand closer to you below the other strand (1) and up, open the gate (2) and pull the rope through the gate from the front to back and sit the rope into the carabiner (3), the gate closes itself automatically. Screw the safety-lock (4) and visually inspect that everything is correct (5) and pull the break-strand (6) to see if the munter hitch flips into another munter hitch as a final check. | '''Steps description''': Start with a rope through a carabiner. Grab the rope strand closer to you behind the other strand. Pull the rope strand closer to you below the other strand (1) and up, open the gate (2) and pull the rope through the gate from the front to back and sit the rope into the carabiner (3), the gate closes itself automatically. Screw the safety-lock (4) and visually inspect that everything is correct (5) and pull the break-strand (6) to see if the munter hitch flips into another munter hitch as a final check. | ||
<!--T:8--> | |||
=== Detailed method === | === Detailed method === | ||
Step-by-step, very detailed description. | Step-by-step, very detailed description. | ||
<!--T:9--> | |||
[[File: Munter_tie_step1.png|100px]] | [[File: Munter_tie_step1.png|100px]] | ||
[[File: Munter_tie_step2.png|100px]] | [[File: Munter_tie_step2.png|100px]] | ||
Revision as of 16:35, 2 August 2025
| Munter hitch | |
|---|---|
 | |
| Use(s) | Belaying, rescue techniques |
| Category | Hitch |
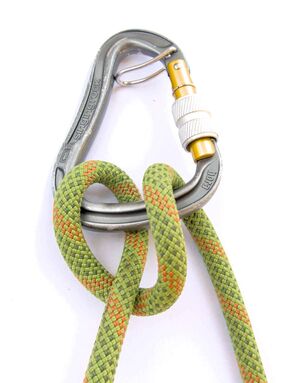
Munter hitch (also known as HMS) is an essential knot used for belaying in occasions when a belay device cannot be used. It is also used in advanced rope techniques (for example rescue techniques).
Tying
For tying, see the methods below.
Single hand method
Fast method using single hand move.
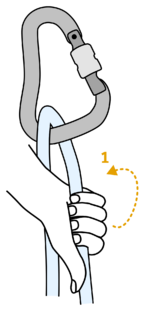
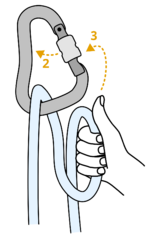
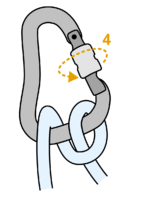
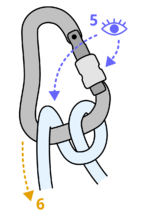
Steps description: Start with a rope through a carabiner. Grab the rope strand closer to you behind the other strand. Pull the rope strand closer to you below the other strand (1) and up, open the gate (2) and pull the rope through the gate from the front to back and sit the rope into the carabiner (3), the gate closes itself automatically. Screw the safety-lock (4) and visually inspect that everything is correct (5) and pull the break-strand (6) to see if the munter hitch flips into another munter hitch as a final check.
Detailed method
Step-by-step, very detailed description.
File:Munter tie step1.png File:Munter tie step2.png File:Munter tie step3.png File:Munter tie step4.png File:Munter tie step5.png File:Munter tie step6.png File:Munter tie step7.png
Steps description: Start with a rope through a carabiner. Pull the rope strand closer to you below the other strand (1), open the gate (2) and pull the rope through the gate from the front (3). sit the rope into the carabiner (4) and close the gate (5). Screw the safety-lock (6), visually inspect that everything is correct (7) and pull the break-strand (8) to see if the munter hitch flips into another munter hitch as a final check (9).
