Clove hitch: Difference between revisions
| Line 22: | Line 22: | ||
[[File: clove_3.png |140px]] | [[File: clove_3.png |140px]] | ||
[[File: clove_4.png |140px]] | [[File: clove_4.png |140px]] | ||
[[File: | [[File: clove_567.png |140px]] | ||
[[File: clove_final_p6.png|84px]] | [[File: clove_final_p6.png|84px]] | ||
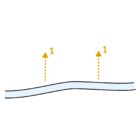
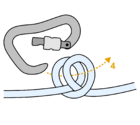
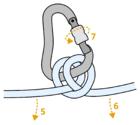
'''Steps description''': start with making a two identical loops on a rope (1,2). Then place one loop over the other in a way that the end-ropes are surrounded by the rope between the lops (3). Pull a carabiner through the loops (4). Tighten the knot by sequentially pulling on the ends a few times and lock the gate (5,6,7). At the end, do not forget to inspect the hitch and the gate lock (8). | |||
=== One-hand method === | === One-hand method === | ||
Revision as of 05:47, 10 August 2025
| Clove hitch | |
|---|---|
| Other names | HMS, HMS knot, munter |
| Use(s) | Belaying, rescue techniques |
| Pros | Fast, simple, just HMS carabiner needed |
| Cons | Rope abrasion, rope tangling, no braking assist |
| Category | Hitch |
Clove hitch is an essential knot used in many occasions when semi-adjustable reliable knot is needed and thus finds its place in most of the knotting operations during climbing such as anchor building, offsetting belay station for the second climber, or self-attaching of the lead climber with a rope to the anchor point.
Quick overview
Tying
Easy method
This method is very robust and suitable for learning how to tie the hitch.
Steps description: start with making a two identical loops on a rope (1,2). Then place one loop over the other in a way that the end-ropes are surrounded by the rope between the lops (3). Pull a carabiner through the loops (4). Tighten the knot by sequentially pulling on the ends a few times and lock the gate (5,6,7). At the end, do not forget to inspect the hitch and the gate lock (8).
One-hand method
Non-crucial, but handy once you have only one hand free.
Quick repositioning
One of the strongest points of the clove hitch is its quick repositioning.


