Garda hitch: Difference between revisions
m →Slippage: - minor refinement |
m readability, language correctness, reformatting to the newer format, adding citations |
||
| Line 3: | Line 3: | ||
{{Infobox knot | {{Infobox knot | ||
| image = File: Garda.jpg | | image = File: Garda.jpg | ||
| pros = Fast, simple, just two carabiners needed | | pros = Fast, simple, just two carabiners needed, works well on a tested setup | ||
| cons = | | cons = Works only one-way, almost impossible to release when loaded, high friction under load, can slip in specific cases, the system misbehaves with some carabiners<ref name=vdiff>{{cite web | url=https://www.vdiffclimbing.com/garda-hitch/ | title=The Garda Hitch (Alpine Clutch) | publisher=VDiff Climbing | first1=Matt | last1=Maddaloni |first1=Neil | last1=Chelton | website=VDiffClimbing.com | access-date=27 September 2025 | url-status=live | archive-url=https://web.archive.org/web/20250512113500/https://www.vdiffclimbing.com/garda-hitch/ | archive-date=12 May 2025}}</ref><ref name=alpinesavvy>{{cite web | url=https://www.alpinesavvy.com/blog/pros-and-cons-of-the-garda-hitch | title=Pros and cons of the Garda Hitch | publisher=Alpinesavvy LLC | first1=John | last1=Godino | website=AlpineSavvy.com | access-date=27 September 2025 | url-status=live | archive-url=http://web.archive.org/web/20250927043118/https://www.alpinesavvy.com/blog/pros-and-cons-of-the-garda-hitch | archive-date=27 September 2025}}</ref> | ||
| uses = (self-)rescue techniques, material hauling | | uses = (self-)rescue techniques, material hauling | ||
| category = Hitch | | category = Hitch | ||
| Line 10: | Line 10: | ||
}} | }} | ||
Garda hitch is one of the elementary hitches used among other applications in | Garda hitch is one of the elementary hitches used among other applications in crevasse self-rescue. Although its simple and works reliably on tested setups, its application scope is limited by its unidirectional nature and high friction under load. In some very specific cases, it has possible [[#slippage|safety issues]], carabiner choice and testing prior to use is crucial for the systems reliability. | ||
== Tying == | == Tying == | ||
'''The two carabiners used for tying should be identical for the knot to work properly!''' D-shaped screw-gate carabiners are recommended.<ref name=vdiff/> It is highly recommended to test the setup on the carabiners intended for garda in advance in a safe environment. | |||
{{#invoke:FlexGallery|gallery|120px | |||
|File: garda_step1.png | |||
|Hang a rope onto two carabiners (1) | |||
|File: garda_step2.png | |||
|Wrap the rear strand around the front carabiner (2) | |||
|File: garda_step3.png | |||
|Take the strand of the rope on the left and move it above the loop (3), garda should seat itself into the corners of the D-carabiners | |||
|File: garda_step4.png | |||
|Secure the gates (4) | |||
|File: garda_step5.png | |||
|Inspect the gates and the garda hitch (5) | |||
}} | |||
== Slippage == | == Slippage == | ||
Garda hitch is prone to slip in some cases, as illustrated and studied by Ryan Jenks (HowNOT2).<ref name=hownot2 /> In general, the smaller the rope diameter and the bigger/more round the carabiners, the | Garda hitch is prone to slip in some cases, as illustrated and studied by Ryan Jenks (HowNOT2).<ref name=hownot2 /> In general, the smaller the rope diameter and the bigger/more round the carabiners, the higher the chance that the hitch slips. The lowest recorded slippage force was at just 2.4 kN (oval screw-gate carabiners used together with 6mm nylon sling). In case of a 9 mm nylon rope, limit force was generally around 8-10 kN (desheating) except for the oval screw-gate carabiners (6 kN, slipping). As 8-10 kN is roughly twice of a force climber experiences during a lead fall, slippage should not be an issue as long as a climbing rope together with D-shaped carabiners is used. | ||
== References == | == References == | ||
Revision as of 04:33, 27 September 2025
| Garda hitch | |
|---|---|
 | |
| Use(s) | (self-)rescue techniques, material hauling |
| Pros | Fast, simple, just two carabiners needed, works well on a tested setup |
| Cons | Works only one-way, almost impossible to release when loaded, high friction under load, can slip in specific cases, the system misbehaves with some carabiners[1][2] |
| Category | Hitch |
| Strength | rope: slipping ~35% (specific cases), breaking ~45-60%[3] |
Garda hitch is one of the elementary hitches used among other applications in crevasse self-rescue. Although its simple and works reliably on tested setups, its application scope is limited by its unidirectional nature and high friction under load. In some very specific cases, it has possible safety issues, carabiner choice and testing prior to use is crucial for the systems reliability.
Tying
The two carabiners used for tying should be identical for the knot to work properly! D-shaped screw-gate carabiners are recommended.[1] It is highly recommended to test the setup on the carabiners intended for garda in advance in a safe environment.
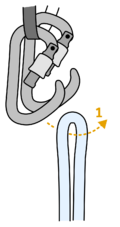
Hang a rope onto two carabiners (1) 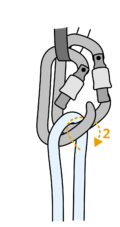
Wrap the rear strand around the front carabiner (2) 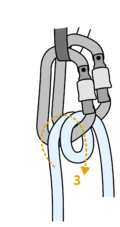
Take the strand of the rope on the left and move it above the loop (3), garda should seat itself into the corners of the D-carabiners 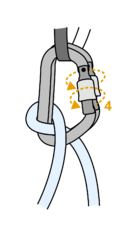
Secure the gates (4) 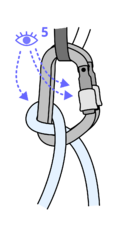
Inspect the gates and the garda hitch (5)


Slippage
Garda hitch is prone to slip in some cases, as illustrated and studied by Ryan Jenks (HowNOT2).[3] In general, the smaller the rope diameter and the bigger/more round the carabiners, the higher the chance that the hitch slips. The lowest recorded slippage force was at just 2.4 kN (oval screw-gate carabiners used together with 6mm nylon sling). In case of a 9 mm nylon rope, limit force was generally around 8-10 kN (desheating) except for the oval screw-gate carabiners (6 kN, slipping). As 8-10 kN is roughly twice of a force climber experiences during a lead fall, slippage should not be an issue as long as a climbing rope together with D-shaped carabiners is used.
References
- ↑ 1.0 1.1 Chelton, Neil. "The Garda Hitch (Alpine Clutch)". VDiffClimbing.com. VDiff Climbing. Archived from the original on 12 May 2025. Retrieved 27 September 2025.
- ↑ Godino, John. "Pros and cons of the Garda Hitch". AlpineSavvy.com. Alpinesavvy LLC. Archived from the original on 27 September 2025. Retrieved 27 September 2025.
- ↑ 3.0 3.1 Jenks, Ryan (4 September 2024). Could you survive with just 2 carabiners?. HowNOT2. Retrieved 16 August 2025.