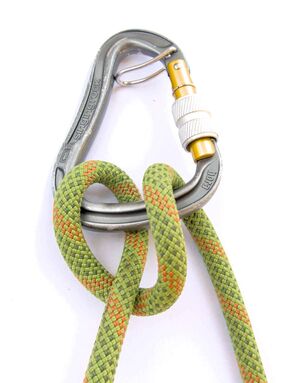
Munter hitch
Munter hitch (also known as HMS) is an essential knot used for belaying in occasions when a belay device cannot be used. It is also used in advanced rope techniques (for example rescue techniques).
Tying
Tying for an anchor belay (easy method)
This method is very robust and suitable for learning how to tie the hitch.
Make a loop (1) Pull a thumb through the loop (2) Place another strand over your thumb and close the hand with your index finger (3) Pull the carabiner through the rope exactly in the path of your thumb (4) Screw the safety-lock (5) Inspect that everything is correct (6) and as a final check, pull the break-strand (7) to test if the Munter hitch flips into another Munter
Tying for a harness belay
Start with a rope through the carabiner which is attached to your harness Take a bight of the rope (1) Create a loop (2) Open the carabiner gate (3) and seat the loop into the carabiner (4) Screw the safety-lock (5) Inspect that everything is correct (6) and pull the break-strand (7) to test if the munter hitch flips into another munter as a final check
Belaying
Always hold the break strand! Belaying with Munter hitch is reliable and reasonably comfortable. Munter works smoothly when not loaded, yet giving friction to catch a fall once tensioned. It blocks regardless of the angle of the breaking hand. The main reason why it is used less often is that if the rope is pulled through the hitch under tension, Munter tends to tangle the rope.
Belaying risks
When belaying with Munter hitch, aside from always holding the break strand, belayer should pay attention to keep fingers at a respectful distance from the knot, otherwise he might risk jamming his fingers into the belay, which might result in a severe finger injury. Belayer should also ensure to tie the Munter in a way that it does not interfere with the carabiner gate/lock. Otherwise the rope friction might unlock, and maybe even open the gate of the carabiner.
When catching a fall, the rope slips a bit through the munter. Keep your hand in a respectful distance from the hitch... ... otherwise you risk jamming a finger If you plan to belay from the harness... ... tie the munter in a way that it does not interfere with the carabiner gate/lock Otherwise the rope friction might unlock... ... or even open the carabiner during belaying
Tie-off - Mule overhand
This is the most recognized method to tie-off the mule overhand to set your hands free. The tie-off consists from a slipknot and then overhand knot, both of which are tied around the life end of the rope. As both of these knots are tied with a bight and rope is also pulled through the carabiner, it takes practice to be able to inspect an tie the tie-off reliably.
If the knot is not in the correct position, flip the knot by giving a bit of a slack (1) Create a loop (2) Move it behind the sharp end of the rope (3) Pull a bight of the rope belay end through the loop (4), making a slipknot around the sharp end Grab the bight with a hand (5) and simultaneously take slack out of the system while releasing the other hand (6), note that the break strand is always being held during this step Pull the bight through the carabiner (7), increase its size if necessary for the next steps Secure the tie-off... ... by making an overhand around the life end of the rope (8,9) And the mule-overhand tie-off is done
Alternative tying methods
Single hand method
Fast method using single hand move.
Start with a rope through a carabiner. Grab the rope strand further from you with your right hand thumb pointing down and rotate your hand counterclockwise (1) Pull the rope through the carabiner gate (2,3) Screw the gate of the carabiner (4) Visually inspect if everything is correct (5) and as a final check pull the break-strand (6) to see if the munter hitch flips into another munter
Detailed method
Step-by-step, very detailed description.
Make a loop on the rope strand farther from you (1) Open the carabiner gate (3) and pull the rope through the gate (2) Sit the rope into the carabiner (4) Close the carabiner gate (5) Screw the safety-lock (6) Visually inspect that everything is correct (7) and pull the break-strand (8)... ... to see if the munter hitch flips into another munter hitch as a final check
