Clove hitch: Difference between revisions
m Added alt text for the infobox |
→Easy method: - added alt texts |
||
| Line 20: | Line 20: | ||
This method is very robust. Suitable for learning how to tie the hitch. | This method is very robust. Suitable for learning how to tie the hitch. | ||
{{#invoke:FlexGallery| | {{#invoke:FlexGallery|gallery_with_widths_alt | ||
|File: clove_1.png | |File: clove_1.png | ||
|163px | |163px | ||
|Take two bights of a rope next to each other (1) | |Take two bights of a rope next to each other (1) | ||
|straight rope with two arrows | |||
|File: clove_2.png | |File: clove_2.png | ||
|163px | |163px | ||
|Form loops out of them by rotating them counterclockwise (2) | |Form loops out of them by rotating them counterclockwise (2) | ||
|rope with two bumps and arrows pointing to twist the bumps | |||
|File: clove_3.png | |File: clove_3.png | ||
|163px | |163px | ||
|Form a hitch by moving the right loop over the left one without any rotation (3) | |Form a hitch by moving the right loop over the left one without any rotation (3) | ||
|rope with two loops | |||
|File: clove_4.png | |File: clove_4.png | ||
|163px | |163px | ||
|Pull a carabiner through the loops (4) | |Pull a carabiner through the loops (4) | ||
|clove hitch in the air with screw-gate carabiner being clipped into it | |||
|File: clove_567.png | |File: clove_567.png | ||
|163px | |163px | ||
|Tighten the knot by sequentially pulling the rope ends (5,6) and lock the gate (7) | |Tighten the knot by sequentially pulling the rope ends (5,6) and lock the gate (7) | ||
|loose clove hitch on unlocked hms carabiner | |||
|File: clove_final.png | |File: clove_final.png | ||
|100px | |100px | ||
|Inspect the knot and the carabiner gate (8) | |Inspect the knot and the carabiner gate (8) | ||
|clove hitch on a locked HMS carabiner with eye icon | |||
|File: clove_final_rainbow.png | |File: clove_final_rainbow.png | ||
|100px | |100px | ||
|Rope ends (pink) leave the knot in the opposing directions from inside of the loop underneath the carabiner (lime) | |Rope ends (pink) leave the knot in the opposing directions from inside of the loop underneath the carabiner (lime) | ||
|clove hitch on a locked HMS carabiner with differently colored rope sections | |||
}} | }} | ||
Revision as of 15:57, 5 November 2025
| Clove hitch | |
|---|---|
 | |
| Use(s) | Anchor building, (self-)attaching to an anchor, belay station offsetting and more |
| Pros | Fast, simple, robust, easily adjustable |
| Cons | In specific cases the hitch might get stuck. It is prone to slip slightly under higher loads. Due to the chance of slippage, it is strongly recommended to back it up in critical applications. |
| Category | Hitch |
| Strength | Breaks: polyamid ~50-60%, 6 mm aramid ~35%. Can slip at lower loads in some cases.[1] |
Review state This page has not been reviewed yet (review state explanation). |
Clove hitch is an essential knot used for its adjustability and reliability. It is employed for instance in anchor building, offsetting a belay station for belaying of the second climber, and for self-attaching to the anchor point with a rope.
Tying
Easy method
This method is very robust. Suitable for learning how to tie the hitch.
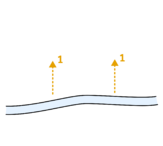
Take two bights of a rope next to each other (1) 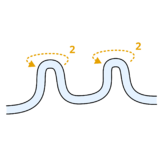
Form loops out of them by rotating them counterclockwise (2) 
Form a hitch by moving the right loop over the left one without any rotation (3) 
Pull a carabiner through the loops (4) 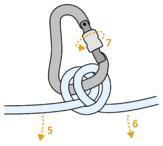
Tighten the knot by sequentially pulling the rope ends (5,6) and lock the gate (7) 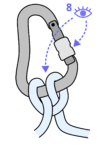
Inspect the knot and the carabiner gate (8) 
Rope ends (pink) leave the knot in the opposing directions from inside of the loop underneath the carabiner (lime)


One-hand method
Non-crucial, but handy once you have only one hand free. Always use the hand at the same side as the gate is facing.
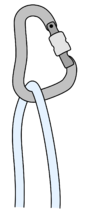
Start with a rope through a carabiner with the gate pointing towards right 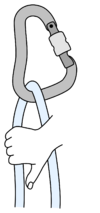
Grab the rear rope strand from the left side by your right hand, thumb pointing down 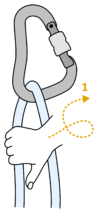
Rotate the hand into a thumb-up position, making a loop (1) 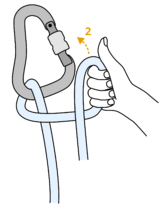
Position the rope in a way, that the rope end coming from the top of your hand goes from the carabiner's front towards its back (2) 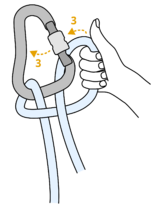
Push the rope coming from the top of your hand through the gate (3) 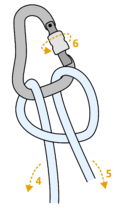
Tighten the knot by sequentially pulling the rope ends (4,5), and lock the gate (6) 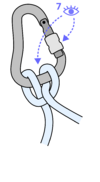
Inspect the knot and the carabiner gate (8)


Quick repositioning
One of the strongest points of the clove hitch is that it can be quickly repositioned without cancelling the setup, or opening the carabiner on which it is tied.[2]

Loosen the knot by pulling the middle strand between the two loops (1) 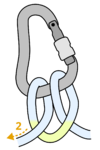
Pull only one of the strands (2) 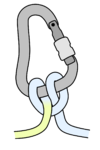
The knot got repositioned


Slippage
| Material | Force (kN) |
|---|---|
| 7.9 mm 1/2 rope | 6.5 |
| 8.9 mm triple-rated rope | 7.8 |
| 8 mm Dyneema® | 3.0 |
| 11 mm Dyneema® | 5.1 |
| 19 mm polyamid | 10.1* |
| 6 mm accessory cord | 6.9 |
The clove hitch generally does not slip below 6 kN of force if you use a dynamic rope on a carabiner. Chance of the slipping is higher if the clove hitch is tied with a static rope, and/or around a big-diameter object (tree, smooth stone). There is a report of slow slippage already at 3 kN of force applied in case that an 8 mm dyneema sling was tied on a carabiner. Therefore in critical applications such as anchor building, the clove hitch should be backed-up, otherwise it might slip off.
For detailed list of values, see the table on the right.[1]
References
- ↑ 1.0 1.1 EDELRID Team (20 October 2020). "Strength reduction of textile materials by knots". edelrid. EDELRID GmbH & Co. KG. Retrieved 10 August 2025.
- ↑ Clove hitch repositioning starts at 7 minutes 10 seconds: Kerr, Alice (19 July 2022). Learning to Trad Climb: Part 3 - How to build a belay. DMM Wales. Retrieved 28 September 2025.