Lowering a lead climber from an anchor: Difference between revisions
Created separate page from the lowering - excluded quick method for clarity and linearity |
put new images, increased image size |
||
| (2 intermediate revisions by the same user not shown) | |||
| Line 4: | Line 4: | ||
=== Lowering from a pre-built sport anchor === | === Lowering from a pre-built sport anchor === | ||
Steps: | Steps: | ||
* Freeing the rope end without loosing the rope (temporary tie-in) | * [[#Freeing the rope end|Freeing the rope end]] without loosing the rope (temporary tie-in) | ||
* Threading the rope through the anchor and retying to its end | * [[#Threading the rope through the anchor|Threading the rope through the anchor]] and retying to its end | ||
* Removing the temporary tie-in, safety checks, cleaning up | * [[#Cleaning up | Removing the temporary tie-in, safety checks, cleaning up]] | ||
==== Freeing the rope end without loosing the rope | ==== Freeing the rope end ==== | ||
{{#invoke:FlexGallery| | Freeing the rope end without loosing the rope by making a temporary tie-in. | ||
|File: | |||
{{#invoke:FlexGallery|gallery_with_widths_alt | |||
|File:prebuilt_lowering_step1.png | |||
|200px | |||
|Pull approximately two arm lengths (two meters) of slack (1) | |||
|Person hanging by a sling and rope on a sport anchor in a toprope setup, hand pulling slack through the toprope | |||
|File:prebuilt_lowering_step2.png | |||
|200px | |||
|Tie a [[Figure_eight#On_a_bight_(tie_in_in_a_middle)|Figure 8 on a bight]] (2) | |||
|Tying a figure eight on the slack at the anchor point | |||
|File:prebuilt_lowering_step3.png | |||
|200px | |||
|Clip it to your harness by a safebiner (3) | |||
|Clipping the figure eight on a slack to the harness by a triple action carabiners | |||
|File:prebuilt_lowering_step4.png | |||
|200px | |200px | ||
| | |Inspect that both the belay loop and the Figure 8 you tied are clipped into the safebiner and that the Figure 8 properly is tied (4) | ||
|File: | |Eye inspecting proper binding into the rope by a safebiner with Figure 8 | ||
|File:prebuilt_lowering_step5.png | |||
|200px | |200px | ||
|Completely untie the Figure | |Completely untie the Figure 8 on the end of the rope (5) | ||
|Arrow pointing to untie the original tie-in point at the end of the rope | |||
|File:prebuilt_lowering_step6.png | |||
|200px | |||
|You have freed the rope end while still being safely tied in | |||
|Person on the anchor tied in with a Figure 8 on a carabiner having a free slack at the end of the rope | |||
}} | }} | ||
==== Threading the rope through the anchor and retying to its end | ==== Threading the rope through the anchor ==== | ||
{{#invoke:FlexGallery| | Threading the rope through the anchor rappel ring and retying to its end. | ||
|File: | |||
{{#invoke:FlexGallery|gallery_with_widths_alt | |||
|File:prebuilt_lowering_step7.png | |||
|200px | |200px | ||
|Pull the loose rope | |Pull the loose end of the rope through the rappel ring (6) | ||
|Arrow suggesting a person on the anchor to pull the slack through the anchor rappel ring | |||
|File:prebuilt_lowering_step8.png | |||
|200px | |||
|And tie in it by a [[Figure_eight#Follow-through_(tie-in_on_the_rope_end)|Figure 8]] (7) | |||
|Arrow suggesting to tie in onto the rope end by figure eight | |||
|File:prebuilt_lowering_step9.png | |||
|200px | |||
|You will get lowered on this knot, so inspect that its properly tied and that the loop goes through both of the harness tie-in loops (8) | |||
|Eye inspection of the figure 8 knot made in the previous step | |||
}} | }} | ||
==== Removing the temporary tie-in, safety checks, cleaning up | ==== Cleaning up ==== | ||
{{#invoke:FlexGallery| | Removing the temporary tie-in, safety checks, cleaning up. | ||
|File: | |||
{{#invoke:FlexGallery|gallery_with_widths_alt | |||
|File:prebuilt_lowering_step10.png | |||
|200px | |200px | ||
| | |Detach the safebiner (9,10) and untie the Figure 8 on a bight (11), excessive slack will slide out itself (12) | ||
|File: | |Dismantling of the tie-in through the triple carabiner | ||
|File:prebuilt_lowering_step11.png | |||
|200px | |||
|Remove the two carabiners intended for the toproping (13) | |||
|Removing of toprope carabiners from an anchor point | |||
|File:prebuilt_lowering_step12.png | |||
|200px | |||
|Before removing your personal anchor, ask your belayer for a block (14) in order to test the setup | |||
|Person on the anchor being pulled towards the anchor by a belayer taking out slack | |||
|File:prebuilt_lowering_step13.png | |||
|160px | |160px | ||
| | |Inspect both the tie-in (15) and the threading of the rope through the anchor rappel ring (16) | ||
|File: | |Eye inspection of the threading of the rope and tie in | ||
|File:prebuilt_lowering_step14.png | |||
|160px | |160px | ||
| | |Unscrew (17) and clean-up (18) the rest of your gear from the anchor | ||
|File: | |Climber on an anchor hanging on a rope tied through the rappel ring removing rest of his gear from the anchor | ||
|File:prebuilt_lowering_step15.png | |||
|160px | |160px | ||
|And | |And get lowered by a belayer (19) | ||
|Person descending from an anchor | |||
}} | }} | ||
=== Lowering from a pre-built sport anchor - quick method === | === Lowering from a pre-built sport anchor - quick method === | ||
| Line 52: | Line 94: | ||
{{#invoke:FlexGallery|gallery | {{#invoke:FlexGallery|gallery | ||
| | |260px | ||
|File: lowering_maillons_step1.png | |File: lowering_maillons_step1.png | ||
|Thread the rope through the maillons. Both maillons should be threaded in the same way - either in->out, or out->in | |Thread the rope through the maillons. Both maillons should be threaded in the same way - either in->out, or out->in | ||
| Line 65: | Line 107: | ||
{{#invoke:FlexGallery|gallery | {{#invoke:FlexGallery|gallery | ||
| | |260px | ||
|File: lowering_bolts_step1.png | |File: lowering_bolts_step1.png | ||
|Thread the rope through the bolts in a way that it wont get easily tangled during lowering. | |Thread the rope through the bolts in a way that it wont get easily tangled during lowering. | ||
|File: lowering_bolts_step2.png | |File: lowering_bolts_step2.png | ||
|Once the bolts are threaded, you continue as in the [[#Lowering from a pre-built sport anchor|method with the rappel ring]] by [[Figure_eight#Follow-through_(tie-in_on_the_rope_end)|tying in by a Figure 8]], the rest of the steps is analogous | |Once the bolts are threaded, you continue as in the [[#Lowering from a pre-built sport anchor|method with the rappel ring]] by [[Figure_eight#Follow-through_(tie-in_on_the_rope_end)|tying in by a Figure 8]], the rest of the steps is analogous | ||
}} | }} | ||
=== References === | === References === | ||
Latest revision as of 18:41, 12 November 2025
Review state This page has not been reviewed yet (review state explanation). |
This method is used for removing gear from a sport anchor, with a subsequent lowering of the lead climber. An alternative is to abseil from an anchor. For routes with no fixed protection at the anchor point (trad), you have either to leave some gear behind, or where it is appropriate and reasonably safe, use for example abseil with an equivocation hitch.
Lowering from a pre-built sport anchor
Steps:
- Freeing the rope end without loosing the rope (temporary tie-in)
- Threading the rope through the anchor and retying to its end
- Removing the temporary tie-in, safety checks, cleaning up
Freeing the rope end
Freeing the rope end without loosing the rope by making a temporary tie-in.
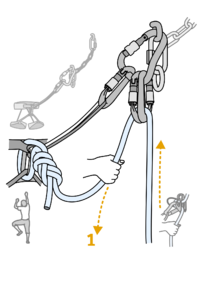
Pull approximately two arm lengths (two meters) of slack (1) 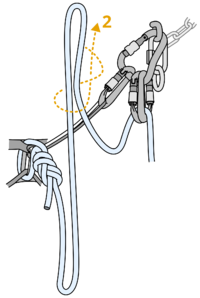
Tie a Figure 8 on a bight (2) 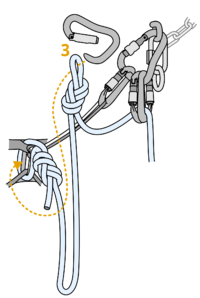
Clip it to your harness by a safebiner (3) 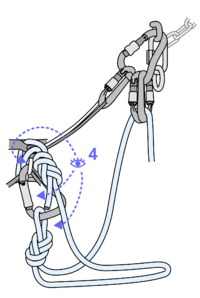
Inspect that both the belay loop and the Figure 8 you tied are clipped into the safebiner and that the Figure 8 properly is tied (4) 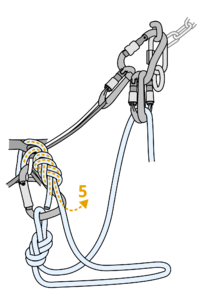
Completely untie the Figure 8 on the end of the rope (5) 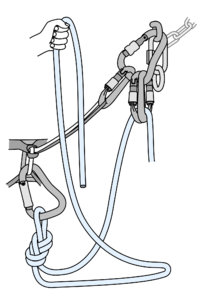
You have freed the rope end while still being safely tied in


Threading the rope through the anchor
Threading the rope through the anchor rappel ring and retying to its end.
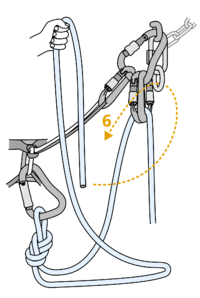
Pull the loose end of the rope through the rappel ring (6) 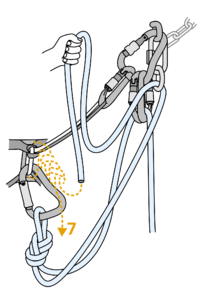
And tie in it by a Figure 8 (7) 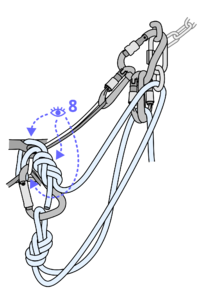
You will get lowered on this knot, so inspect that its properly tied and that the loop goes through both of the harness tie-in loops (8)


Cleaning up
Removing the temporary tie-in, safety checks, cleaning up.
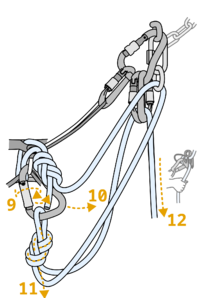
Detach the safebiner (9,10) and untie the Figure 8 on a bight (11), excessive slack will slide out itself (12) 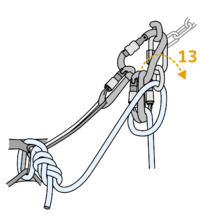
Remove the two carabiners intended for the toproping (13) 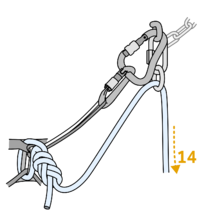
Before removing your personal anchor, ask your belayer for a block (14) in order to test the setup 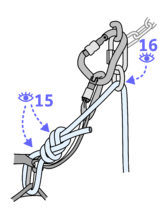
Inspect both the tie-in (15) and the threading of the rope through the anchor rappel ring (16) 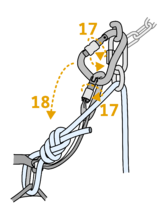
Unscrew (17) and clean-up (18) the rest of your gear from the anchor 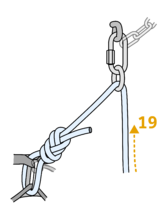
And get lowered by a belayer (19)


Lowering from a pre-built sport anchor - quick method
See the separate page with the quick method description.
Lowering from bolts with maillons
Lowering from maillons is analogous to the lowering from a pre-built sport anchor, except that you thread the rope through the maillons instead of the rappel ring. To ensure redundancy, you must thread the rope through both maillons, as there is no chain connecting the bolts. The quick method can be used only if the maillons are big enough, othewise it quickly becomes cumbersome.
Thread the rope through the maillons. Both maillons should be threaded in the same way - either in->out, or out->in 
Once the maillons are threaded, you continue as in the method with the rappel ring by tying in by a Figure 8, the rest of the steps is analogous


Lowering directly from bolts or fixed ring
This method is forbidden by climbing associations in some countries and places.[1] The ban is due to an increased bolts and fixed rings abrasion which leads to unnecessary and undesired shortening of the material replacement cycles. For example at traditional sandstone routes which are (due to a tradition) almost exclusively equipped with fixed rings, it would mean additional drilling into a rock which is often protected by a law due to nature preservation for further generations.[2] In addition, this method cannot be used for lowering directly from hanger plates as the friction over the plates edges would severely damage the rope.
The method is very similar to the method with maillons, only the rope is in this case threaded directly through the bolts.

Thread the rope through the bolts in a way that it wont get easily tangled during lowering. 
Once the bolts are threaded, you continue as in the method with the rappel ring by tying in by a Figure 8, the rest of the steps is analogous


References
- ↑ For example the czech mountaineering association allows abseiling exclusively. For toprope, it explicitly orders to place carabiners into the fixed protection (Article 3, number 4): Výkonný výbor ČHS (June 12, 2020). "Pravidla lezení ve skalních oblastech ČR" (PDF). horosvaz.cz. Český horolezecký svaz. Retrieved 1 November 2025.
- ↑ Kublák, Tomáš. "Horní jištění". Horolezeckametodika.cz. HOROLEZECKÁ METODIKA. Archived from the original on 5 March 2024. Retrieved 1 November 2025.