Anchor building, (self-)attaching climber to an anchor, belay station offsetting and more
Pros
Fast, simple, robust, easily adjustable
Cons
In specific cases it is prone to stuck or slip slightly under bigger loads. Due to chance of slippage, it is strongly recommended to back it up in critical applications.
Category
Hitch
Strength
polyamid ~50-60%, 6mm aramid ~35%, slips lower in some cases[1]
Clove hitch is an essential knot used for its adjustability and reliability. Its employed for instance in anchor building, offsetting a belay station for belay of the second climber and for self-attaching of the lead climber with a rope to the anchor point.
Tying
Easy method
This method is very robust. Suitable for learning how to tie the hitch.
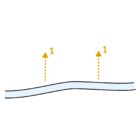
Take two bights of a rope next to each other (1)
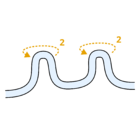
Form loops from them by rotating them counterclockwise (2)
Form a hitch by placing the right loop over the left one (3)
Pull a carabiner through the loops (4)
Seat the knot by sequentially pulling the rope ends (5,6) and lock the gate (7)
To safely tie and inspect the knot, remember that the rope ends coming out of the knot should be sticking in the opposite directions and that they should be surrounded by the section of the rope that stems from between the loops.
One-hand method
Non-crucial, but handy once you have only one hand free.
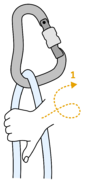
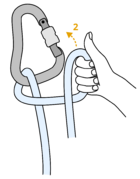
Start with a rope through carabiner by grabbing the strand further from you with your thumb pointing down and rotating it into a thumb-up position (1)
Note that the rope is crossing the front string now, thus making a loop. Open the gate and pull the rope through it (2). The rope string coming from the hitch should go behind the carabiner in this step
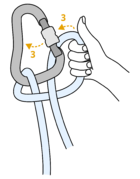
After pulling the rope through, the gate should close itself automatically (3)
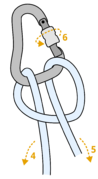
Seat the knot by sequentially pulling the rope ends (4,5) and lock the gate (6)
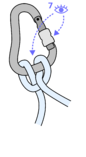
Inspect the knot and the carabiner gate (8)
Quick repositioning
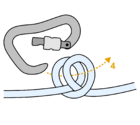
One of the strongest points of the clove hitch is its quick repositioning without cancelling the setup or opening the carabiner.
Steps description: Pull the middle strand between the two loops (1). By this you loosen the knot and pull the rope from the both sides. Then pull one of the strands, re-tightening and repositioning the knot in the process (2).
Slippage
Table of slipping forces (*=breaks):
Material
Force (kN)
7.9 mm 1/2 rope
6.5
8.9 mm triple-rated rope
7.8
8 mm Dyneema®
3.0
11 mm Dyneema®
5.1
19 mm polyamid
10.1*
6 mm accessory cord
6.9
this section is not yet inspected thoroughly, statements might be incorrect and/or misleading!
In case of a dynamic rope around a carabiner, the clove hitch generally does not slip till ~6 kN. Chance of slipping is higher if the clove hitch is tied around a big-diameter object (tree, smooth stone), and with static ropes. With 8mm dyneema sling around a carabiner there is a report of slow slippage already ~3 kN of force. For list of values, see the table on the right.[1] Therefore the clove hitch should be backed-up by another knot in critical applications, for example in cases where it might slip off the end of the sling/rope.


